
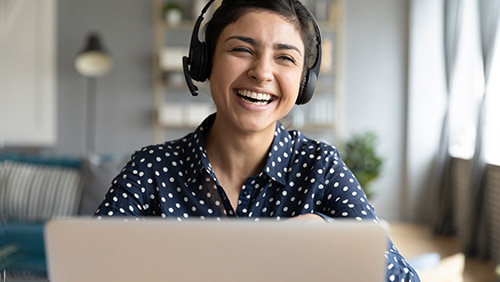
 A little over two years ago I prepared a “top tips” piece on how to film the best Skype Video interviews because I thought the information could be handy. Never did I ever think this format of interviews would become so incredibly significant in our daily lives, I mean who ever would? Fortunately, when COVID hit, I was set up to make an instant switch from in-person to remote video interviews and for this I am forever grateful.
Ever since the pandemic forced our world to go online for nearly everything, I’ve had an endless flood of requests asking for advice on how to conduct remote video interviews from home. Up until now, I’ve been responding with my piece from 2018 and I wanted to update my tips for all to take advantage of.
Skype Call Recorder
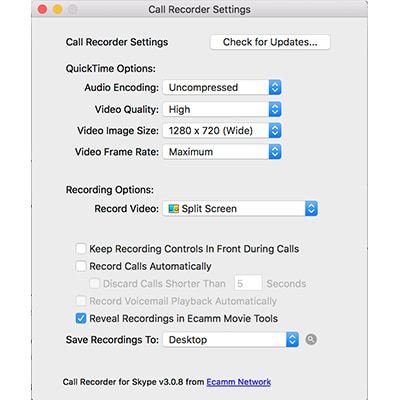
So yes, I’m still using the exact same Skype call recorder I was using from day number one. As I said in my previous piece, for a one-time payment of $40 USD, you can download the Call Recorder and after all these years and several computers (3?), it has never let me down. Below is a snapshot of the settings I (still) personally use.
While I realize many of you would likely prefer to use Zoom or another platform, unfortunately, I don’t have experience with anything other than Skype, but I’m sure its not that hard to figure out. The rest of my tips below should be applicable to your needs regardless of what recording platform you choose to use.
Lighting
Now this is an area where I have certainly picked up more knowledge in the past two years, mostly after reviewing footage and realizing that I look awful.
Having the best possible lighting can make a world of difference- you can make yourself look like a movie star or, conversely, like you’ve been on a five day bender depending on how you set up your lighting.
The first thing you must do is purchase some lights and the good news is they do not have to be expensive. These days I have upgraded to using three different kinds of lights:
1.) An LED light. Try a simple reading light with a clip such as this one for £12.95. I set up the LED light directly behind and just above my computer, turn the light on full blast and point it straight at my face for frontal lighting.
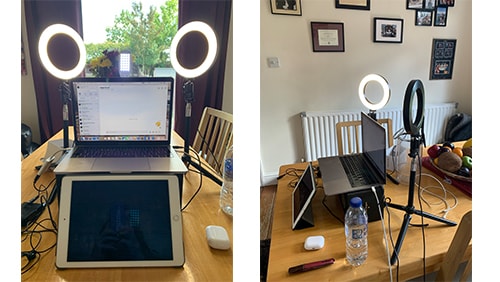
2.) Two ring lights. Such lights are designed for Snap Chatters, Instagram Vloggers and Selfie Enthusiasts, although these types usually use one ring light and point it directly at their face. I suggest buying two and the ring lights I chose came in at £19 apiece, a bargain for the magic they do.
I set up the ring lights to the right and the left of my LED light at an angle (see pictures below), so my whole face is lit up and any lines, shadows, imperfections, etc are drastically reduced. The ring lights also have a few settings that you can play around with, including dimmable brightness and adjustable light color.
3.) Natural light. Stated simply, always face a window as opposed to having one behind you or at one side.
For the room I use, I have to make adjustments to my curtains depending on what time of day it is- if its earlier in the day and the sun is coming directly through my windows, I need to shut the curtains a bit. If its later in the day and the sun has moved, I open up the curtains completely.
Again, this is something you can play around with, but remember, all times of day are not equal with natural light.
Chair, camera angle and background
Once you’ve found the best location for lighting in your home, I recommend picking out a chair that does not have any wheels, otherwise you may find yourself swaying back and forth and you won’t know it until you’re reviewing the footage.
Set up your computer so its camera is at your eye level- I prop up my computer on a box – but this will depend on your height and the height of the table, chair, desk, etc.
The angle of your computer should be approximately at 90 degrees or an “L” shape. Play around with this as well because the camera angle can drastically change the way it picks up the lighting on your face, even if you just adjust the angle by a fraction.
Be aware of what’s in your background as well, having a picture or plant can look nice and nowadays we can even upload our own image depending on the platform. I personally use the “blurred background” function of Skype which can be found within “Audio & Video Settings”, under the “Skype” menu at the top of your screen.
To check all of the above, simply visit the same “Audio & Video” window of your Skype and make any adjustments necessary.
Audio input & output
If you have access to a lav mic and receiver, you can use them for your audio input as the sound will be much clearer than if you use your computer’s onboard mic.
However, such sophisticated equipment is not necessary for video interviews conducted on the computer as we are sitting so close to the device. Instead you can try something like the Samson Go Mic which I have just purchased for £50.
For my interviewees’ audio output, I use my Apple AirPods Pro as you can’t really see them and the noise reduction feature is more than welcomed, blocking out any potential distractions. If you don’t want to spring for the AirPods Pro, just a simple headset or ear buds for phone calls will do.
Avoiding unwanted interruption
Some of these tips might sound obvious, but please be sure to shut the door, close your windows, shut off noisy devices such as a fan or AC (if its hot, try putting an ice pack under your bare feet while you shoot- trust me, I’ve done this!!!) turn off the volume on your phone, turn the phone face down to avoid distraction and close all the applications on your computer apart from Skype.
Closing all the applications on your computer will also help improve the quality and clarity of your Skype call and be sure to advise your interviewee to do the same. Restarting both computers can also help if you’re experiencing technical issues.
Lastly, please inform your colleagues, kids, partner, etc, to avoid entering the room while you’re filming and beware of pets that might start scratching at the door.
Preparing interviewees
Be sure to make it clear you will be filming a Skype VIDEO interview as opposed to audio- there is often confusion, especially if you’re communicating through a PR rep or EA. You can also pass on some tips for lighting, sound, etc, in advance so you don’t waste any time on the day.
Touch base with your interviewee the day before and even the day of filming to confirm the call and prevent last minute cancellations.
Find out if your interviewee is nervous about the video call and if they are, assure them you will have a casual video chat before the recording begins. I find my nervous interviewees start to relax after a few minutes of video chat, so perhaps build this “pre-interview” time into your schedule if necessary.
Interviewer notes
If you are concerned about remembering your questions as an interviewer, create a “cheat sheet” and place it on the table in front of your computer so you can glance down at it here and there, there is no shame in that! I like to use my iPad, as you can see in the set-up pictures above.
That’s it, now enjoy!